In ForNAV 7.1 and higher, it is possible to set different purposes for your bank accounts and to generate your reports with the right bank account number automatically.
The Bank Account Selections function works on the following tables:
- “Sales Header”
- “Sales Shipment Header”
- “Sales Invoice Header”
- “Sales Cr.Memo Header”
- “Return Shipment Header”
- “Return Receipt Header”
- “Purchase Header”
- “Purchase Header Archive”
- “Purch. Rcpt. Header”
- “Purch. Inv. Header”
- “Purch. Cr. Memo Hdr.”
- “Reminder Header”
- “Issued Reminder Header”
- “Finance Charge Memo Header”
- “Issued Fin. Charge Memo Header”
- “Service Header”
- “Service Invoice Header”
- “Service Shipment Header”
- “Service Cr.Memo Header”
- “Sales Header Archive”
- “Service Contract Header”
When it is set up, you can add specific bank accounts to reports based on various conditions. For instance, you can have a bank account to handle US Dollars or to service a specific Responsibility Center or customer base.
Set up – Business Central
To set up the automatic selection, you first have to set up the Bank Account Selections page in the Business Central ForNAV extension.

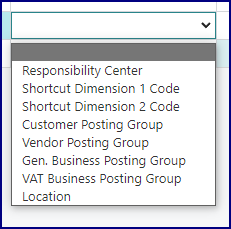
Here you can set various conditions by Type (further specified by Code) or by Currency, and specify which Bank Account to use. (In the example above, there is a bank account set up to handle transactions through a specific responsibility center (BrieBus) and a bank account to handle transactions in US Dollars.
The Sequence No is used to assign priority in case multiple lines are eligible, 0 being the highest priority. ForNAV finds the first line that fits the conditions and then stops looking. If ForNAV can’t find any applicable lines then it returns the bank account that is set up in the Company Information.
The available Types are:
Set up – ForNAV Designer
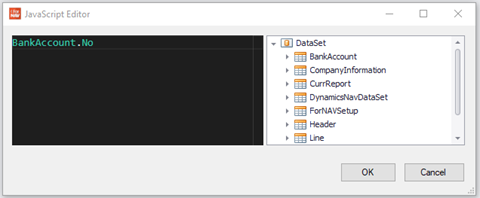
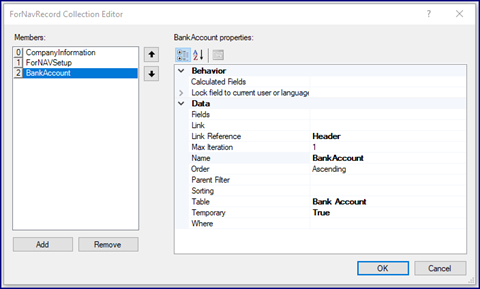
To get the dynamic Bank Account field in your reports, you have to add the BankAccount table to the dataset of your report (in Properties > Data > Records) and add a Link Reference to the Header (you don’t need to specify a link). Make sure that the Temporary property is set to True.
Now the Bank Account output refers to the account that ForNAV has found for this report, so when you add (or change) a textbox to output the Bank Account Number it will now output the account number that applies to this report.