Before reading this article, please make sure you have familiarized yourself with the ForNAV Direct Print overview: https://www.fornav.com/direct-print/, and installed and configured the ForNAV Direct Print service or client.
With ForNAV 6.2 (and later versions), you can define local printers and print ForNAV, RDLC, and Word reports to them directly, without seeing the usual PDF Print dialog. It is also possible to specify printer attributes, such as Paperkind (A4, Letter, …), Landscape, Duplex, Copies, Color, and Paper Source (paper bins).
Note:
For this to work, you must:
- Install ForNAV 6.2 (or a later version) if you have not already done so.
- Make sure you have installed the ForNAV Report Pack 6.2 or a later version (either from the Gallery, if you are running Business Central OnPrem, or from Microsoft AppSource, if you are running Business Central Cloud).
- Upgrade your existing ForNAV reports – at least those that you want to print directly – to ForNAV 6.2 if you are running Business Central OnPrem.

The Default printer is always defined as the default printer on the machine where the browser window with Business Central runs.
The columns in the ForNAV Local Printers page specify the following:
- Cloud Printer Name – the name to specify in the Printer Selections page.
-
Local Printer Name – the name of the printer on the local machine (DEFAULT means the default printer on the local machine). This must be exactly the same name as the printer on the local machine. You can copy/paste the printer name from the Printer Properties dialog:

- Description – the description of the printer, which is also shown in the Printer Management page.
- Paperkind – Default, Custom, A4, Letter, … (Default means the default for the region, Custom means that the size is specified by the Unit, Width, and Height columns).
- Unit – the unit of measure for the custom paper size.
- Width and Height – the paper size.
- Color – specifies if the printout should be in color or grey scale.
- Landscape – specifies the paper orientation: default for the report, or portrait or landscape.
- Duplex – Default, simplex, vertical, or horizontal.
- Copies – the number of copies.
- Paper Source Kind – the paper tray (Printer Specific, Default, Upper, Middle, Lower, …).
- Printer Specific Paper Source Name – the name of the of the printer specific paper source.
-
Scale Mode and Scale – specifies if the document is printed in the actual size, fitted, or zoomed to a scale percentage.
Note:
Most printer drivers will not work with the predefined paper sources (Upper, Lower, and so on). You must define a Printer Specific Paper Source Kind and a Printer Specific Paper Source Name. If the predefined paper source does not exist, the printer prints out a list of the valid paper sources and printer specific paper source names after the last page of the report. You can use this to identify the correct combination of Paper Source Kind and Printer Specific Paper Source Name.
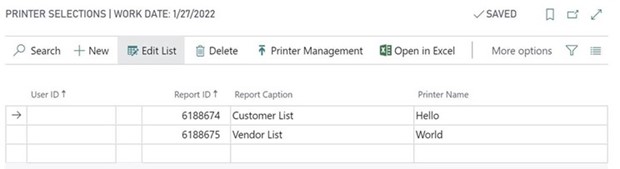
When you have specified a printer on the ForNAV Direct Printers page, you can use it on the Printer Selections page to specify which printer to print to for a ForNAV report:
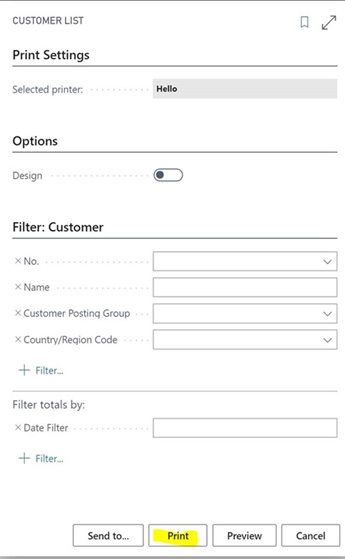
You are now ready to print and can run one of your ForNAV, RDLC, or Word reports to test it:
Direct Print to a local printer also works in AL-code where the Report.Print function will print directly to a local printer without opening the request page.
Note: The following is only relevant if you are running the ForNAV Direct Print – Client print:
When you run the report and click Print on the request page, the download notification appears in your browser – in this example the Microsoft Edge browser:
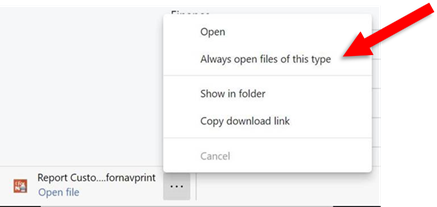
To print the report to your local printer (and next time you print, not get the download notification), click Always open files of this type.
For an overview of ForNAV Direct Print, please see: https://www.fornav.com/direct-print/
